
The Essential Packing Guide: Expert Tips for Packing Every Room in Your Home Efficiently
Moving is one of the most logistics-heavy tasks a household faces, and a room-by-room approach to packing simplifies the process, reduces damage, and speeds unpacking. This guide teaches practical, room-specific techniques—from fragile dish packing in the kitchen to disassembling bedroom furniture—so you can pack efficiently, protect valuables, and manage time and cost. You will find step-by-step how-to sections, checklists, packing-supply recommendations, and decision criteria for when to hire professionals or use temporary storage. The article also highlights decluttering prompts that reduce box counts and outlines how to protect electronics, artwork, and high-value items. For readers who prefer help, Your Hometown Mover is listed as a partner that offers full packing and unpacking, partial packing, and discounted packing supplies, providing an option for stress-free transitions while you focus on essentials. Read on for room-specific workflows, supplies tables, and practical checklists you can use during every stage of your move.
Why Use a Room-by-Room Packing Strategy for Moving?
A room-by-room packing strategy organizes items by location and function, which reduces confusion during loading, transit, and unpacking. Sorting by room helps you prioritize high-use items, identify what to donate or discard, and pack similar items together for better protection and easier inventory management. This method shortens moving day because movers and helpers can load, label, and place boxes according to room destination, minimizing time spent searching at the new home. The structure below gives three clear benefits and a quick example of how room-by-room packing changes the moving experience.
Whether you’re moving across town or just a few blocks, efficient planning is key. For seamless transitions within your city, consider specialized local moving services that understand the unique challenges of urban relocations.
Room-by-room packing offers three primary operational benefits:
- Faster unpacking: Boxes are labeled by destination, reducing time to set up essential areas.
- Less damage: Like-items packed together reduce shifting and protect fragile pieces.
- Easier inventory: Room-based lists make it simple to check that all boxes arrived.
These advantages set the stage for practical decluttering and the focused packing techniques described in the next sections, starting with how organized packing makes decluttering both easier and more effective.
What Are the Benefits of Organized Room-Specific Packing?
Organized room-specific packing reduces stress, speeds the move, and protects belongings by grouping items that share handling and storage requirements. For example, packing all kitchen glassware together lets you use dish packs and consistent cushioning, while storing linens together reduces overpacking with heavy boxes. Labeling every box with room, broad contents, and special handling notes makes triage straightforward on moving day and simplifies insurance and replacement tracking. A compact micro-checklist below captures immediate actions to see benefits quickly.
- Photograph high-value items before packing.
- Label boxes with room and top three contents.
- Reserve one essentials box per room for immediate use.
By applying these actions you reduce last-minute decision-making and create smoother handoffs to helpers or professional packers, which leads naturally to the next topic: how decluttering before packing reduces cost and workload.
How Does Decluttering Improve Your Packing Process?
Decluttering trims volume, lowers moving costs, and reduces the stress of deciding what to keep under time pressure; it’s a preparatory step that improves every subsequent packing decision. Sorting items into keep, donate, sell, and recycle piles by room lets you estimate box counts more accurately and avoid paying to move items you no longer need. Targeted declutter prompts—like clearing a single closet or pantry shelf at a time—break the task into manageable steps and provide immediate reductions in packing time. When items are clearly categorized, moving teams or DIY packers can allocate the right box sizes and protection methods, which decreases the chance of damage.
The positive impact of decluttering on household efficiency is further supported by studies on methodologies like 5S, which demonstrate significant improvements in managing living spaces.
Decluttering for Home Efficiency: 5S Methodology
family members tasked with decluttering their home. The measured times indicate a marked improvement in efficiency the impact of 5S on the most frequently performed household
” Transforming Home Efficiency: Implementing the 5s Methodology for a Clutter-Free Living Space, 2025
- Start with bulky, seldom-used items (out-of-season gear, extra bedding).
- Use a “one-week rule” for clothing and gadgets: if unused in a week, consider donating.
- Book junk removal for true trash and list sellable items online.
A deliberate declutter also creates opportunities to use short-term storage or moving services selectively, which will be helpful when deciding whether to hire professionals for packing and transport later in this guide.
Beyond sorting and donating, some items simply need to be disposed of. For efficient and eco-friendly disposal of unwanted items, consider professional junk removal services to clear out your home before the move.
How to Pack Your Kitchen for Moving: Dishes, Appliances, and Pantry Essentials
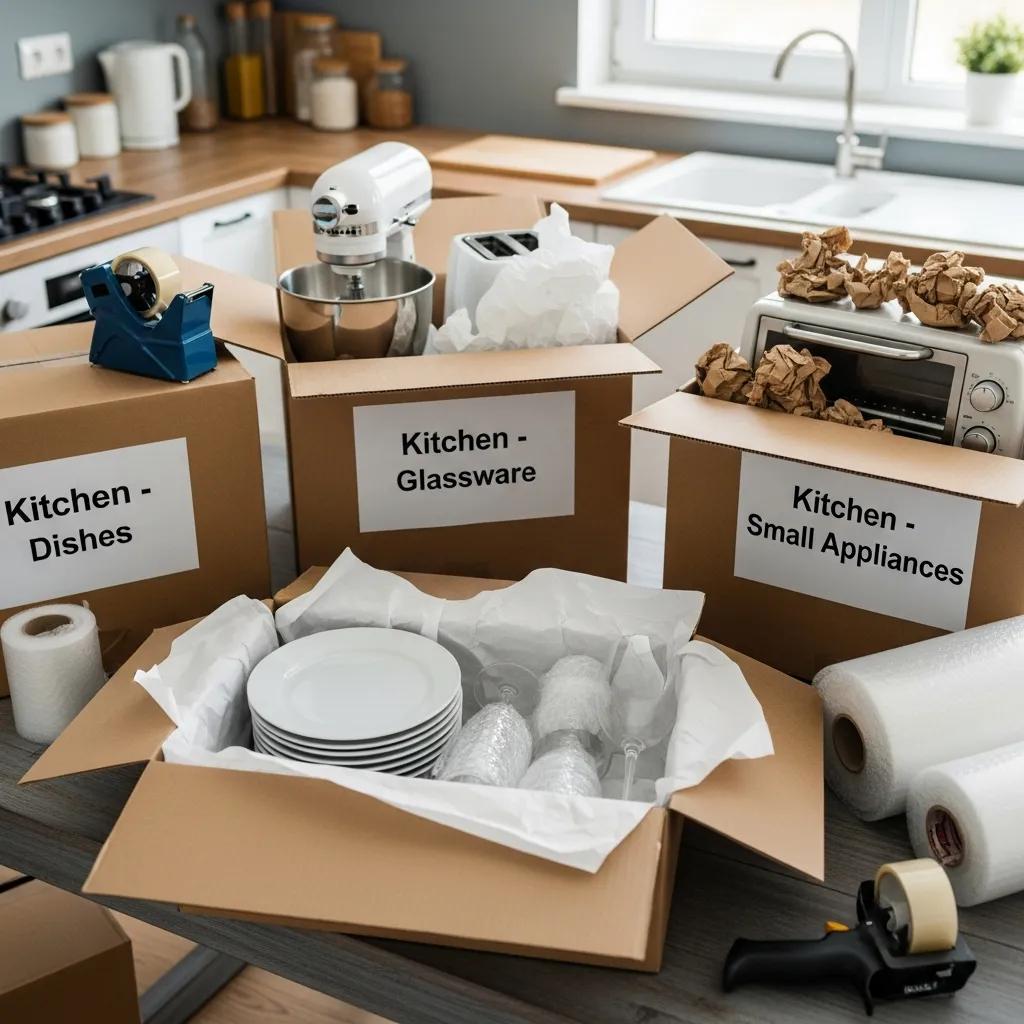
Packing a kitchen requires prioritizing fragile dishes, securing appliances, and organizing pantry items so essentials remain accessible through moving day. Start by separating non-essentials—decorative pieces, extra serving dishes—and pack them first; keep one box of daily-use items for last. For appliances, unplug, defrost where needed, secure cords, and pad corners; for fragile dishes, use dish packs or wrap each item and pack vertically to minimize pressure. Label boxes by “Kitchen” and content type (e.g., “Dishes—Fragile”) and indicate which boxes contain essentials to unpack first. These steps reduce breakage and speed the setup of a working kitchen in the new home.
Follow this step-by-step kitchen packing process:
- Purge and prioritize: Remove expired pantry items and pack non-essentials first.
- Protect appliances: Clean, disconnect, and secure cords; use moving blankets or original boxes.
- Wrap fragile items: Individually wrap glassware with padding, use dish packs for plates.
- Label and group: Mark boxes by content and room; keep an essentials box accessible.
These steps prepare you to choose the right materials and quantities; the table below summarizes common kitchen items, suggested packing methods, and the materials you’ll typically need.
Kitchen packing quick reference:
| Kitchen Item | Packing Method | Materials / Fragility Rating |
|---|---|---|
| Plates & bowls | Wrap individually, stack vertically in dish pack | Packing paper, dish pack, medium box / High |
| Stemware & glasses | Wrap stems and bowls, use dividers | Bubble wrap, dish pack inserts / High |
| Small appliances | Remove detachable parts, wrap, box upright | Bubble wrap, small-medium boxes / Medium |
| Pots & pans | Nest with padding, use small boxes for weight | Packing paper, small boxes / Low-Medium |
| Pantry items | Group by type, seal liquids, box or bin | Reusable bins, tape / Low |
This table helps you match protection level to item fragility; for long-distance moves, consider double-boxing high-value glassware. The next section drills into fragile-item techniques so you can implement wrapping and stabilization precisely.
What Are the Best Techniques for Packing Fragile Kitchen Items?
Fragile kitchen items require a reproducible wrapping and stabilization sequence to prevent cracks and chips: wrap, cushion, box, and fill voids. Begin by wrapping each piece in packing paper, then add a layer of bubble wrap for extra protection; use dividers for stemware and vertical placement for plates to distribute pressure. For long-distance moves, double-box valuables—place a packed box into a slightly larger box with cushioning between—to absorb impact. Clearly label boxes “Fragile” and denote top orientation, and keep a short inventory of which box contains which fragile group to speed claims or recovery if damage occurs.
- Wrap each item separately and use consistent layering.
- Use vertical packing for plates and bowls to minimize stacked weight.
- Double-box irreplaceable items or family heirlooms.
Following these steps reduces breakage risk and makes it easier to delegate fragile packing to helpers or professional packers, tying into the selection of supplies discussed next.
Which Packing Supplies Are Essential for Kitchen Items?
Choosing the right supplies ensures fragile items survive transit and heavy items are manageable. Essential items include dish packs for plates, small to medium boxes for glassware, bubble wrap for extra padding, packing paper to prevent scratches, quality tape, and markers for labeling. Reusable containers and airtight bins make moving pantry items faster and reduce spillage; consider keeping a few everyday plates and utensils in an “open first” kit. Your Hometown Mover offers moving and packing supplies and discounted packing supplies for household moves, which can simplify sourcing these materials when you prefer professional-grade options.
- Dish packs and small/medium boxes for fragile items.
- Bubble wrap, packing paper, and packing tape.
- Markers, labels, and stretch wrap for organized packing.
- Reusable bins for pantry and small appliance storage.
Selecting the right mix of supplies helps reduce wasted boxes and speeds the chore of packing; the EAV table above helps estimate what you’ll need per typical kitchen inventory.
Bedroom Packing Checklist: Clothes, Linens, and Furniture Disassembly Tips
A bedroom-focused packing plan separates clothing, linens, and furniture disassembly into manageable tasks to prevent damage and make reassembly straightforward. Start by sorting clothes into hanging, folded, and donation piles; use wardrobe boxes for hanging garments and vacuum bags for bulky linens (with care for delicate fabrics). Photograph complex furniture assemblies before disassembly, bag and label hardware, and protect wooden surfaces with furniture pads and padding. Clearly label each furniture piece with its room destination and orientation to help movers place items correctly at the new home.
Essential bedroom packing actions include:
- Sort clothing: Use wardrobe boxes for hanging items and labeled boxes for folded items.
- Protect linens: Use breathable vacuum bags for bulky bedding but avoid on delicate fabrics.
- Disassemble furniture: Photograph, bag hardware, and pad surfaces before transport.
These steps reduce reassembly time and prevent lost parts, setting up the next paragraphs that explain clothing strategies and detailed furniture disassembly.
How Should You Pack Clothes and Linens Efficiently?
Efficient clothing and linen packing balances wrinkle prevention with box weight and convenience for unpacking. Wardrobe boxes let you move hanging garments directly, minimizing ironing; folded items go into small-to-medium boxes so they’re not too heavy to carry. Vacuum bags compress bulky seasonal bedding, but avoid compressing delicate fibers like silk or cashmere. Label boxes by content and season to prioritize what you unpack first, and keep a clearly marked essentials bag with one outfit, bedding, and toiletries per person for the first night.
- Use wardrobe boxes for suits and dresses to avoid creasing.
- Pack heavy items in small boxes to keep lifting manageable.
- Label boxes by room and priority to guide unpacking order.
These tactics reduce immediate post-move chaos and make furniture protection and reassembly, covered next, far easier.
What Is the Best Way to Disassemble and Pack Bedroom Furniture?
Disassembling bedroom furniture safely requires planning, photos, and consistent hardware management so reassembly is efficient and damage-free. Start by taking reference photos of assembled pieces and marking orientation; remove drawers and small parts, and bag hardware with labeled tags. Wrap bed frames, headboards, and dressers in furniture blankets or corrugated pads and secure with stretch wrap to protect finished surfaces. Place screws and small components in labeled bags taped to the furniture piece or stored in a clearly marked hardware box.
- Photograph furniture before disassembly for reference.
- Bag and label all hardware parts and fasteners.
- Pad and wrap wooden and upholstered surfaces to prevent scratches.
With these protections in place, movers or DIY teams can transport bedroom items with less risk, allowing you to turn to fragile-item packing strategies for other high-value pieces in the home.
Packing Fragile Items for Moving: Glassware, Electronics, and Artwork
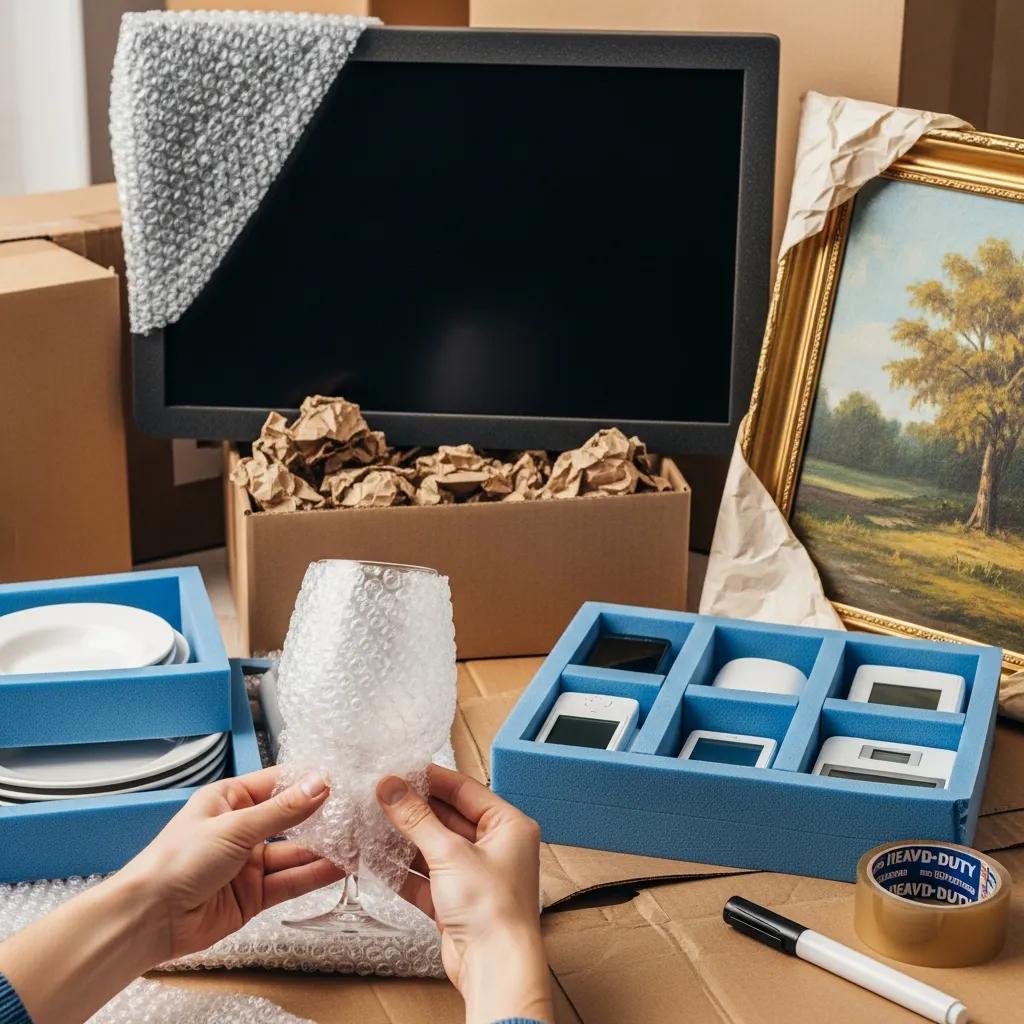
Fragile-item packing requires item-specific protection strategies that address fragility, distance, and insurance considerations to minimize risk. For glassware and china, use dish packs with dividers and fill voids to immobilize items; electronics benefit from original packaging or equivalent cushioning with anti-static measures for sensitive components. Artwork may need backing, corner protectors, or custom crating for transport; for high-value pieces, professional crating reduces handling risk. Document serial numbers and photograph items before packing to aid insurance claims and inventory tracking if loss or damage occurs.
Below are targeted best-practice approaches for fragile categories:
- Glassware & china: Wrap individually, use dividers, and fill voids to prevent movement.
- Electronics: Keep screens protected, bag cords separately, and use anti-static materials.
- Artwork: Consider backing, corner protection, or crating for valuable pieces.
This overview leads into specific glassware techniques and electronics/artwork practices that follow.
How Do You Safely Pack Fragile Glassware and China?
Safely packing glassware and china follows a repeatable sequence: individual wrap, strategic stacking, cushioning, and void-fill to prevent movement and pressure points. Wrap each piece in packing paper, then bubble wrap for added shock protection and place plates vertically in dish packs to better distribute force. Use dividers or molded inserts for stemware and seal boxes with heavy-duty tape; clearly mark them “Fragile” and list contents. For heirlooms or long-distance moves, double-boxing provides extra shock absorption and peace of mind.
- Wrap each item separately and use vertical packing for plates.
- Use dividers or inserts for fragile stemware.
- Double-box irreplaceable items for long-distance moves.
These measures minimize the most common causes of glass breakage during transit and transition naturally into electronics and artwork protection strategies.
What Are the Best Practices for Packing Electronics and Artwork?
Electronics require protection against static, impact, and cable tangles: use original packaging when available, anti-static bags for components, and adequate padding around screens and corners. Label and bag cables and accessories, pairing them with their device and photographing connections for reassembly. Artwork protection depends on medium and value; framed pieces typically need corner protectors and rigid backing, while high-value or oddly sized works often require professional crating. Document condition with timestamps and keep receipts or appraisals for high-value items to support insurance.
- Use original boxes when possible or mimic internal supports with foam and padding.
- Bag and label cords and accessories to prevent loss.
- Prefer crating for large or valuable artwork to reduce handling risk.
These precautions preserve electronics and artwork integrity across moves and inform decisions about when to hire professional packers or craters, discussed next.
What Essential Packing Supplies Do You Need? Tape, Bubble Wrap, Boxes, and More
A focused supplies plan ensures you have the right box sizes and protective materials for different household items and helps estimate quantities for typical home sizes. Basic essentials include small boxes for heavy items, medium boxes for mixed items, large boxes for linens, dish packs for plates, wardrobe boxes for hanging clothing, packing paper, bubble wrap, heavy-duty tape, stretch wrap, markers, and furniture pads. When choosing materials, match box strength to item weight and prefer double-wall boxes for long-distance moves. Your Hometown Mover offers moving and packing supplies and discounted packing supplies, which can be helpful when sourcing professional-grade materials.
Common supply use-cases and estimated quantities by home size:
| Supply Item | Size / Use / Cost Estimate | Recommended Qty (Studio / 1BR / 2BR / 3BR) |
|---|---|---|
| Small boxes | Heavy items, books; single or double-wall | 10 / 20 / 30 / 40 |
| Medium boxes | Kitchenware, small appliances | 8 / 20 / 30 / 40 |
| Large boxes | Linens, pillows, lightweight items | 5 / 10 / 15 / 25 |
| Dish packs | Plates, stemware (high protection) | 4 / 6 / 8 / 10 |
| Wardrobe boxes | Hanging clothes & coats | 0 / 1-2 / 2-4 / 4-6 |
| Bubble wrap & paper | Padding and wrap | 1-2 rolls / 2 rolls / 3 rolls / 4 rolls |
This table helps you estimate what to buy or request from a supplier; buying a bit extra for cushioning is usually better than running short. Below are quick tips for choosing the right boxes and tools.
How to Choose the Right Moving Boxes and Packing Materials?
Choosing the right boxes depends on weight and fragility: small boxes are best for heavy items like books, while large boxes suit light bulky items such as pillows. Double-wall boxes provide extra protection for fragile or long-distance moves, while specialty boxes—dish packs and wardrobe boxes—solve specific needs like glassware and hanging garments. Reuse boxes when they are structurally sound, and reinforce seams on heavier loads. Keep box weight under comfortable carrying limits (roughly 30–50 lbs) to reduce injury risk.
- Match box size to item weight to avoid overpacking.
- Use double-wall boxes for fragile or valuable items.
- Reuse or recycle boxes when structurally safe to do so.
These guidelines make packing safer and more efficient, and the next section lists tools that speed packing and reduce damage.
What Are the Must-Have Packing Tools and Accessories?
Certain tools significantly speed packing and improve safety: a quality tape dispenser, box cutter, permanent markers for labeling, stretch wrap for bundled items, furniture pads, moving straps, and a dolly for heavy items. Corner protectors and furniture blankets prevent cosmetic damage to wood and upholstered pieces, while a basic toolkit and labeled hardware bags simplify reassembly. Budget-conscious movers can substitute by using towels and blankets for padding and color-coded labels for quick identification.
Understanding the importance of proper loading and securement is crucial for preventing damage during transit, as highlighted by research into logistics environments.
Efficient Loading & Securement for Damage-Free Moving
This paper is the fourth paper in a series of papers that analyzed results from a major damage assessment study that examined challenges products endure during shipping and handling in the mixed-load and less-than-truckload (LTL) logistics environments. Improper loading and lack of load securement inside the trailer can result in damage to both packages and the products they contain, and can lead to subsequent injury during unloading. The paper discusses improperly loaded trailers, and recommends proper loading methods.
Load securement and packaging methods to reduce risk of damage and personal injury for cargo freight in truck, container and intermodal shipments, J Singh, 2014
- Packing tape, tape dispenser, and box cutter for efficient sealing.
- Furniture pads, stretch wrap, and moving straps to protect larger items.
- Dolly and labeled hardware bags to simplify transport and reassembly.
Using these tools reduces packing time and lowers the risk of damage, preparing you to decide whether to DIY or hire professionals in the next section.
When Should You Consider Professional Packing Services? Costs and Benefits Explained
When deciding whether to hire professional packers, assess time constraints, item value, the complexity of disassembly, and distance of the move; professionals are most valuable when time is tight, items are high-value, or logistics are complex. Hiring pros often reduces damage, saves time, and provides insurance or guarantees where available; it can also simplify scheduling and coordination so you can focus on other priorities. For many households, a hybrid approach—DIY for basics and professionals for fragile or bulky items—offers an optimal balance between cost savings and protection. Below is a quick decision checklist to help evaluate whether to hire help.
- You should hire professionals if you lack time, have many fragile or high-value items, or face a complex, long-distance move.
- Consider a partial pack for rooms with most fragile goods (kitchen, artwork) and DIY for closets and non-breakables.
- Use supply-only service if you want professional materials but plan to pack yourself.
After you’ve weighed benefits, compare service options. Your Hometown Mover offers full packing and unpacking, partial packing, and discounted packing supplies; these specific options fit different needs and budgets. The table below compares service options and their typical use cases.
Service options comparison:
| Service Option | What’s Included | Primary Benefit / Typical Use Case |
|---|---|---|
| Full packing and unpacking | Team packs entire home and unpacks at destination | Best for time-strapped customers or full-service moves |
| Partial packing | Team packs selected rooms or fragile items | Ideal for hybrid moves where client handles basics |
| Discounted packing supplies | Professional-grade materials at reduced cost | Good for DIY movers wanting reliable supplies |
This comparison clarifies how professional services map to common moving scenarios and prepares you to request estimates or schedule teams for the services that fit your move.
What Packing Service Options Does Your Hometown Mover Offer?
Your Hometown Mover provides a range of moving and packing solutions designed to match varying customer needs: full packing and unpacking, partial packing, and discounted packing supplies. Full packing and unpacking is best when you want a turnkey solution—teams handle everything from protective wrapping to unpacking at the new home. Partial packing targets specific rooms or fragile collections, letting you control simpler items while pros secure valuables. Discounted packing supplies allow DIY movers access to professional-grade materials without premium pricing, making it easier to pack safely.
- Full packing and unpacking is suited to complex or time-limited moves.
- Partial packing lets you combine cost savings with professional protection for valuables.
- Discounted packing supplies support DIY packing with better materials at lower cost.
These factual service descriptions help you choose the right level of assistance while keeping control of budget and timing, and the next subsection explains the main ways professionals save you time and stress.
How Does Hiring Professional Packers Save Time and Reduce Stress?
Professional packers bring efficiency, training, and systems that reduce packing time and minimize damage, typically completing tasks much faster than untrained teams. They use standardized packing sequences, proper materials, and secure packing techniques, which lowers the likelihood of breakage and reduces the need for post-move repairs or replacements. For busy families or businesses, hiring professionals transforms the move from a multi-day household task into a managed operation with predictable timelines. Additionally, using licensed and insured teams that operate owned trucks and no subcontractors improves accountability and reliability during the move.
- Professionals wrap and load items systematically to reduce handling time.
- Experienced teams reduce damage incidents through proven techniques.
- Service guarantees and license/insurance status provide additional peace of mind.
When time savings, damage reduction, or convenience justify the cost, professional packers are a strong option—especially for fragile, high-value, or high-volume moves where the operational benefits outweigh DIY savings.